How GPS Sync thinks
GPS Sync exists for one problem: your camera and your GPS logger are two devices with two clocks, and the footage you actually want to overlay is rarely one untouched file. GoPros chapter long recordings into several MP4s, you stop and restart the camera, and you trim clips before caring about telemetry. A single fixed offset between "video time" and "GPS time" cannot survive any of that.
So the app is built around three ideas:
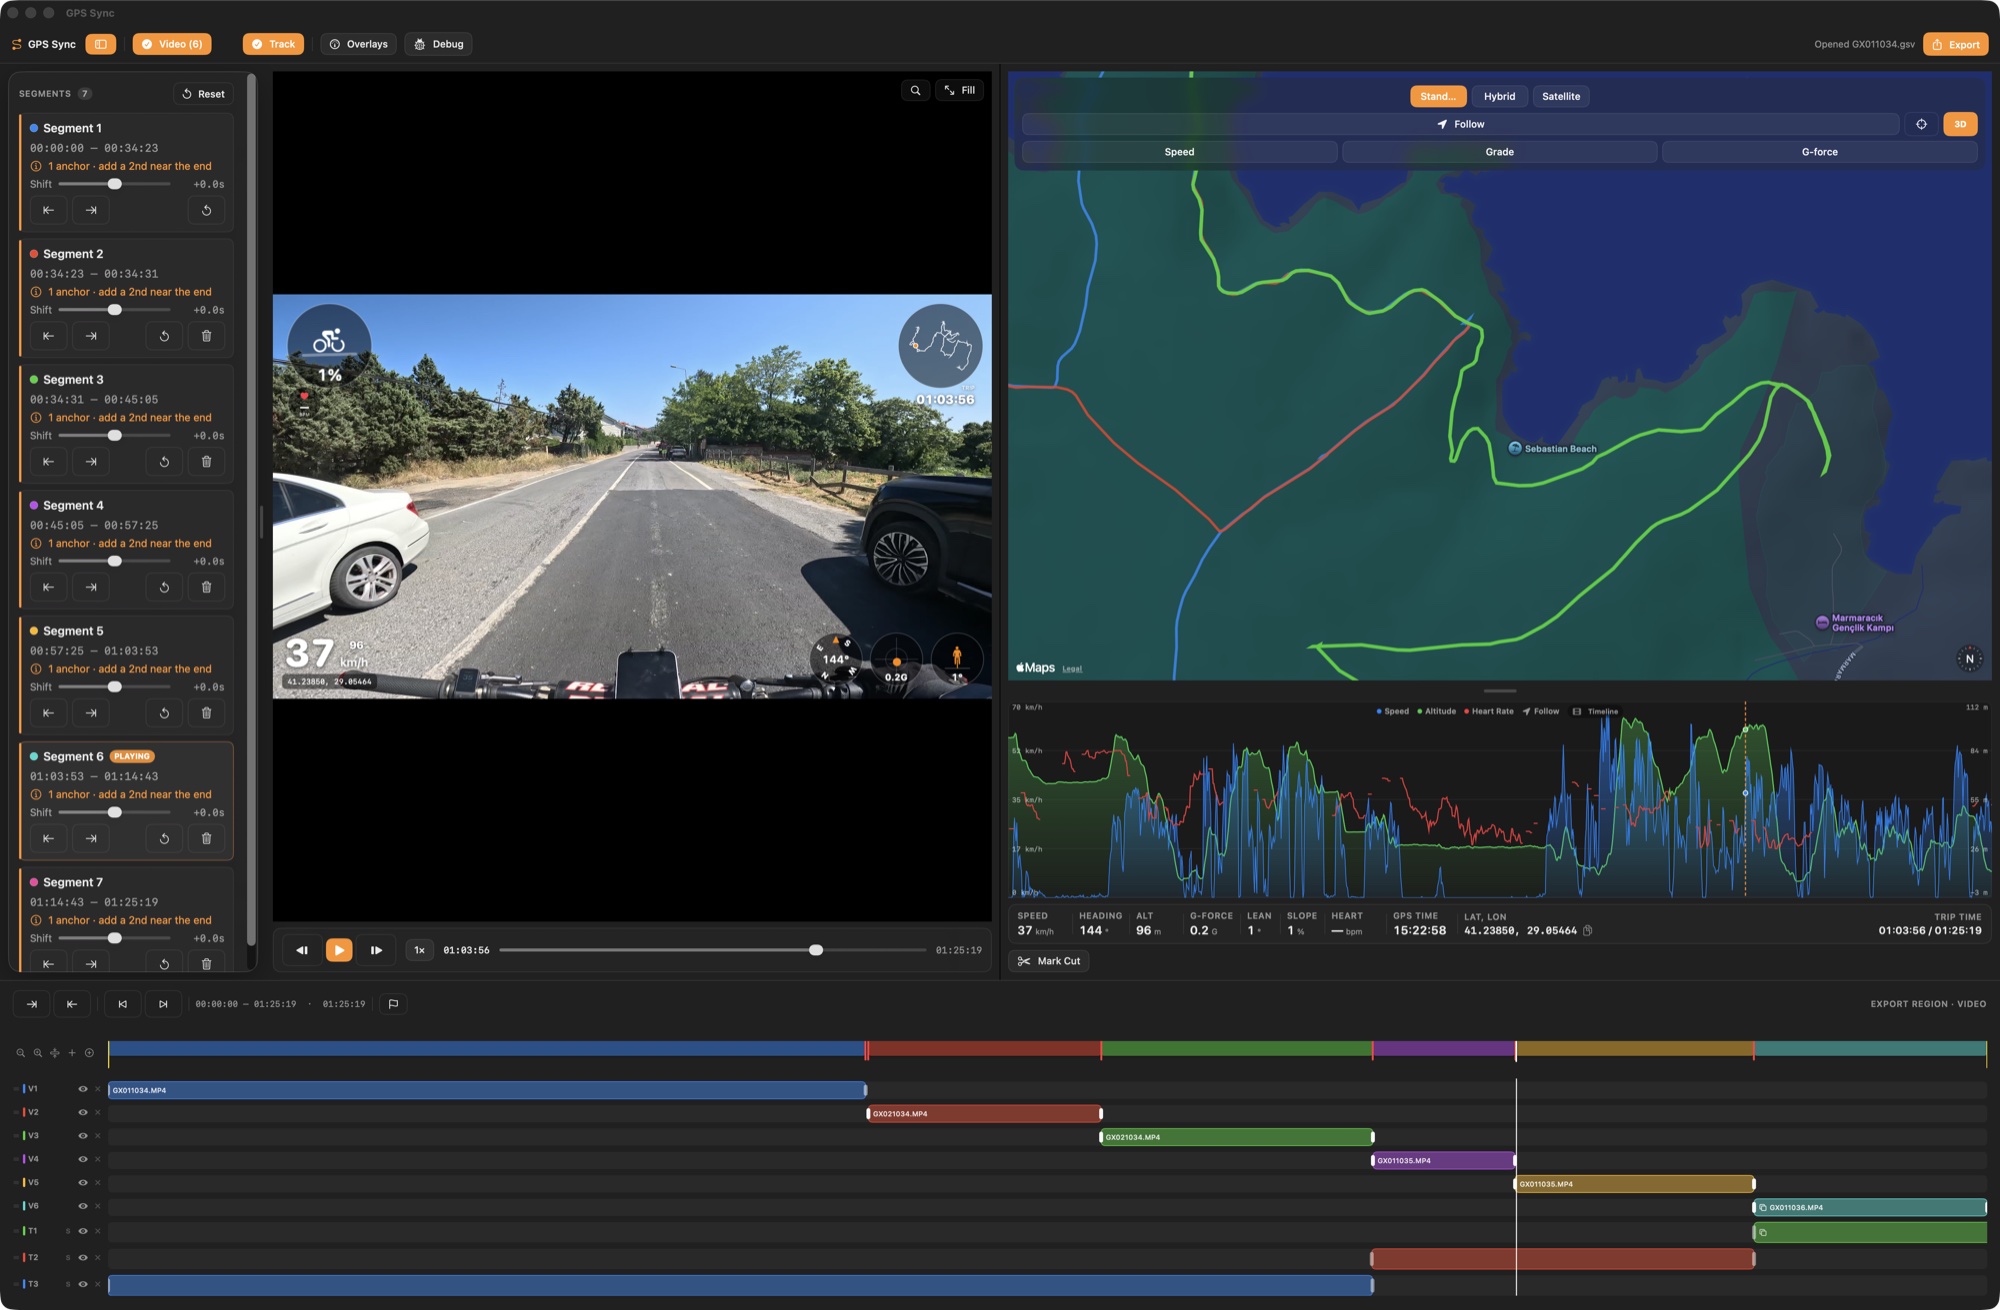
- Segments. The video timeline is split at every cut and clip boundary. Each segment aligns to GPS time on its own, with its own position and fine-tune shift.
- Placement. A segment is positioned by dragging its data track on the timeline or by one-click Sync by Time from the recording clocks; the per-segment Shift slider dials in the last fraction of a second.
- Tracks. Every data file you load — GPX, KML, KMZ, NMEA, Tripper .trip, DJI .SRT, a GoPro's embedded GPS — is its own track on the timeline. Tracks are layered: where several have data, the topmost one speaks.
Everything else — the map, the profile graph, overlays, exports — reads from this one synced model. Sync once, and every view agrees.
Getting started
Requirements
GPS Sync is a native macOS app and requires macOS 26 on Apple Silicon. No account, no data collection; only Apple Maps tiles come from the network.
Load your video
- Click Video in the toolbar (or drop files onto the window) and pick one or more clips. Selecting a GoPro's chaptered files together stitches them into one timeline, each clip on its own lane.
- If a clip carries usable embedded GPS (GoPro GPMF, including HERO13-class GPS9), the app offers to use it right away — a complete sync with zero manual work. Cameras without a GPS fix are skipped silently.
- If a DJI .SRT sidecar sits next to a drone clip, the app offers to load its telemetry as a data track.
Load your data
Click GPX and pick a track file: GPX, KML, KMZ, NMEA, or a Tripper .trip (which brings IMU-grade elevation, slope, g-force, lean and heart rate — and, on CAN-equipped electric motorcycles, power, current, RPM, battery, pack voltage and ride mode, which also add a Bike row to the live readout panel). Every file you load becomes its own row in the timeline — loading a second file never replaces the first.
You can also work with no video at all: load just a track — or several — to scrub them on the map, study the profile graph, line the logs up on a ride-time timeline, and convert or crop them via the export menu.
Syncing, three ways
Pick whichever fits your gear — they combine freely: Sync by Time places a track, and a drag afterwards simply refines it.
Scenario A: GoPro with embedded GPS — zero clicks
- Load the MP4s. The app detects moving GPS samples in the GPMF stream and asks "Use Embedded GPS?"
- Accept. The track appears, already aligned — the camera itself timestamped every fix.
- Done. Jump straight to overlays or the map.
Scenario B: Phone logger + action cam — Sync by Time
You recorded the ride with a logging app (Tripper, or anything writing GPX) while a camera filmed. Both devices stamp their recordings with real clock times.
- Load the video and the track.
- Right-click the data track in the timeline and choose Sync by Time — the app matches the camera's recording timestamp against the track's timestamps and places the data absolutely.
- Scrub and check a few recognisable moments. If the camera's clock was off (a GoPro not paired with Quik for weeks can drift tens of seconds), drag the data track to correct it, or dial the segment's Shift slider.
Scenario C: No usable clocks — align visually
Old footage, a logger with a wrong clock, or a track from someone else. You sync by recognising places.
- Scrub the video to a moment you can place on the map — a gate, a bridge, a hairpin. The magnifier (Z) helps read landmarks, dashboards or clocks in frame.
- Drag the data track along the timeline until the map marker sits exactly where the camera was at that moment — edges snap to the playhead, markers and clip boundaries.
- Fine-tune with the segment's Shift slider in the segments panel (range configurable up to ±300 s in Settings).
Scenario D: Cut or chaptered footage — segments
You trimmed the boring stop out of the middle, or the camera split the ride into chapters. One offset can't describe that; segments can.
- Clip boundaries become segment boundaries automatically. For a cut inside a clip, park the playhead on the splice and press Mark Cut (C).
- Align each segment on its own — Sync by Time, then drag or Shift-slide to refine. The time removed by your edit falls out of each segment's own placement — nothing to calculate by hand.
- The segments panel lists every segment with its own shift and status.
The timeline
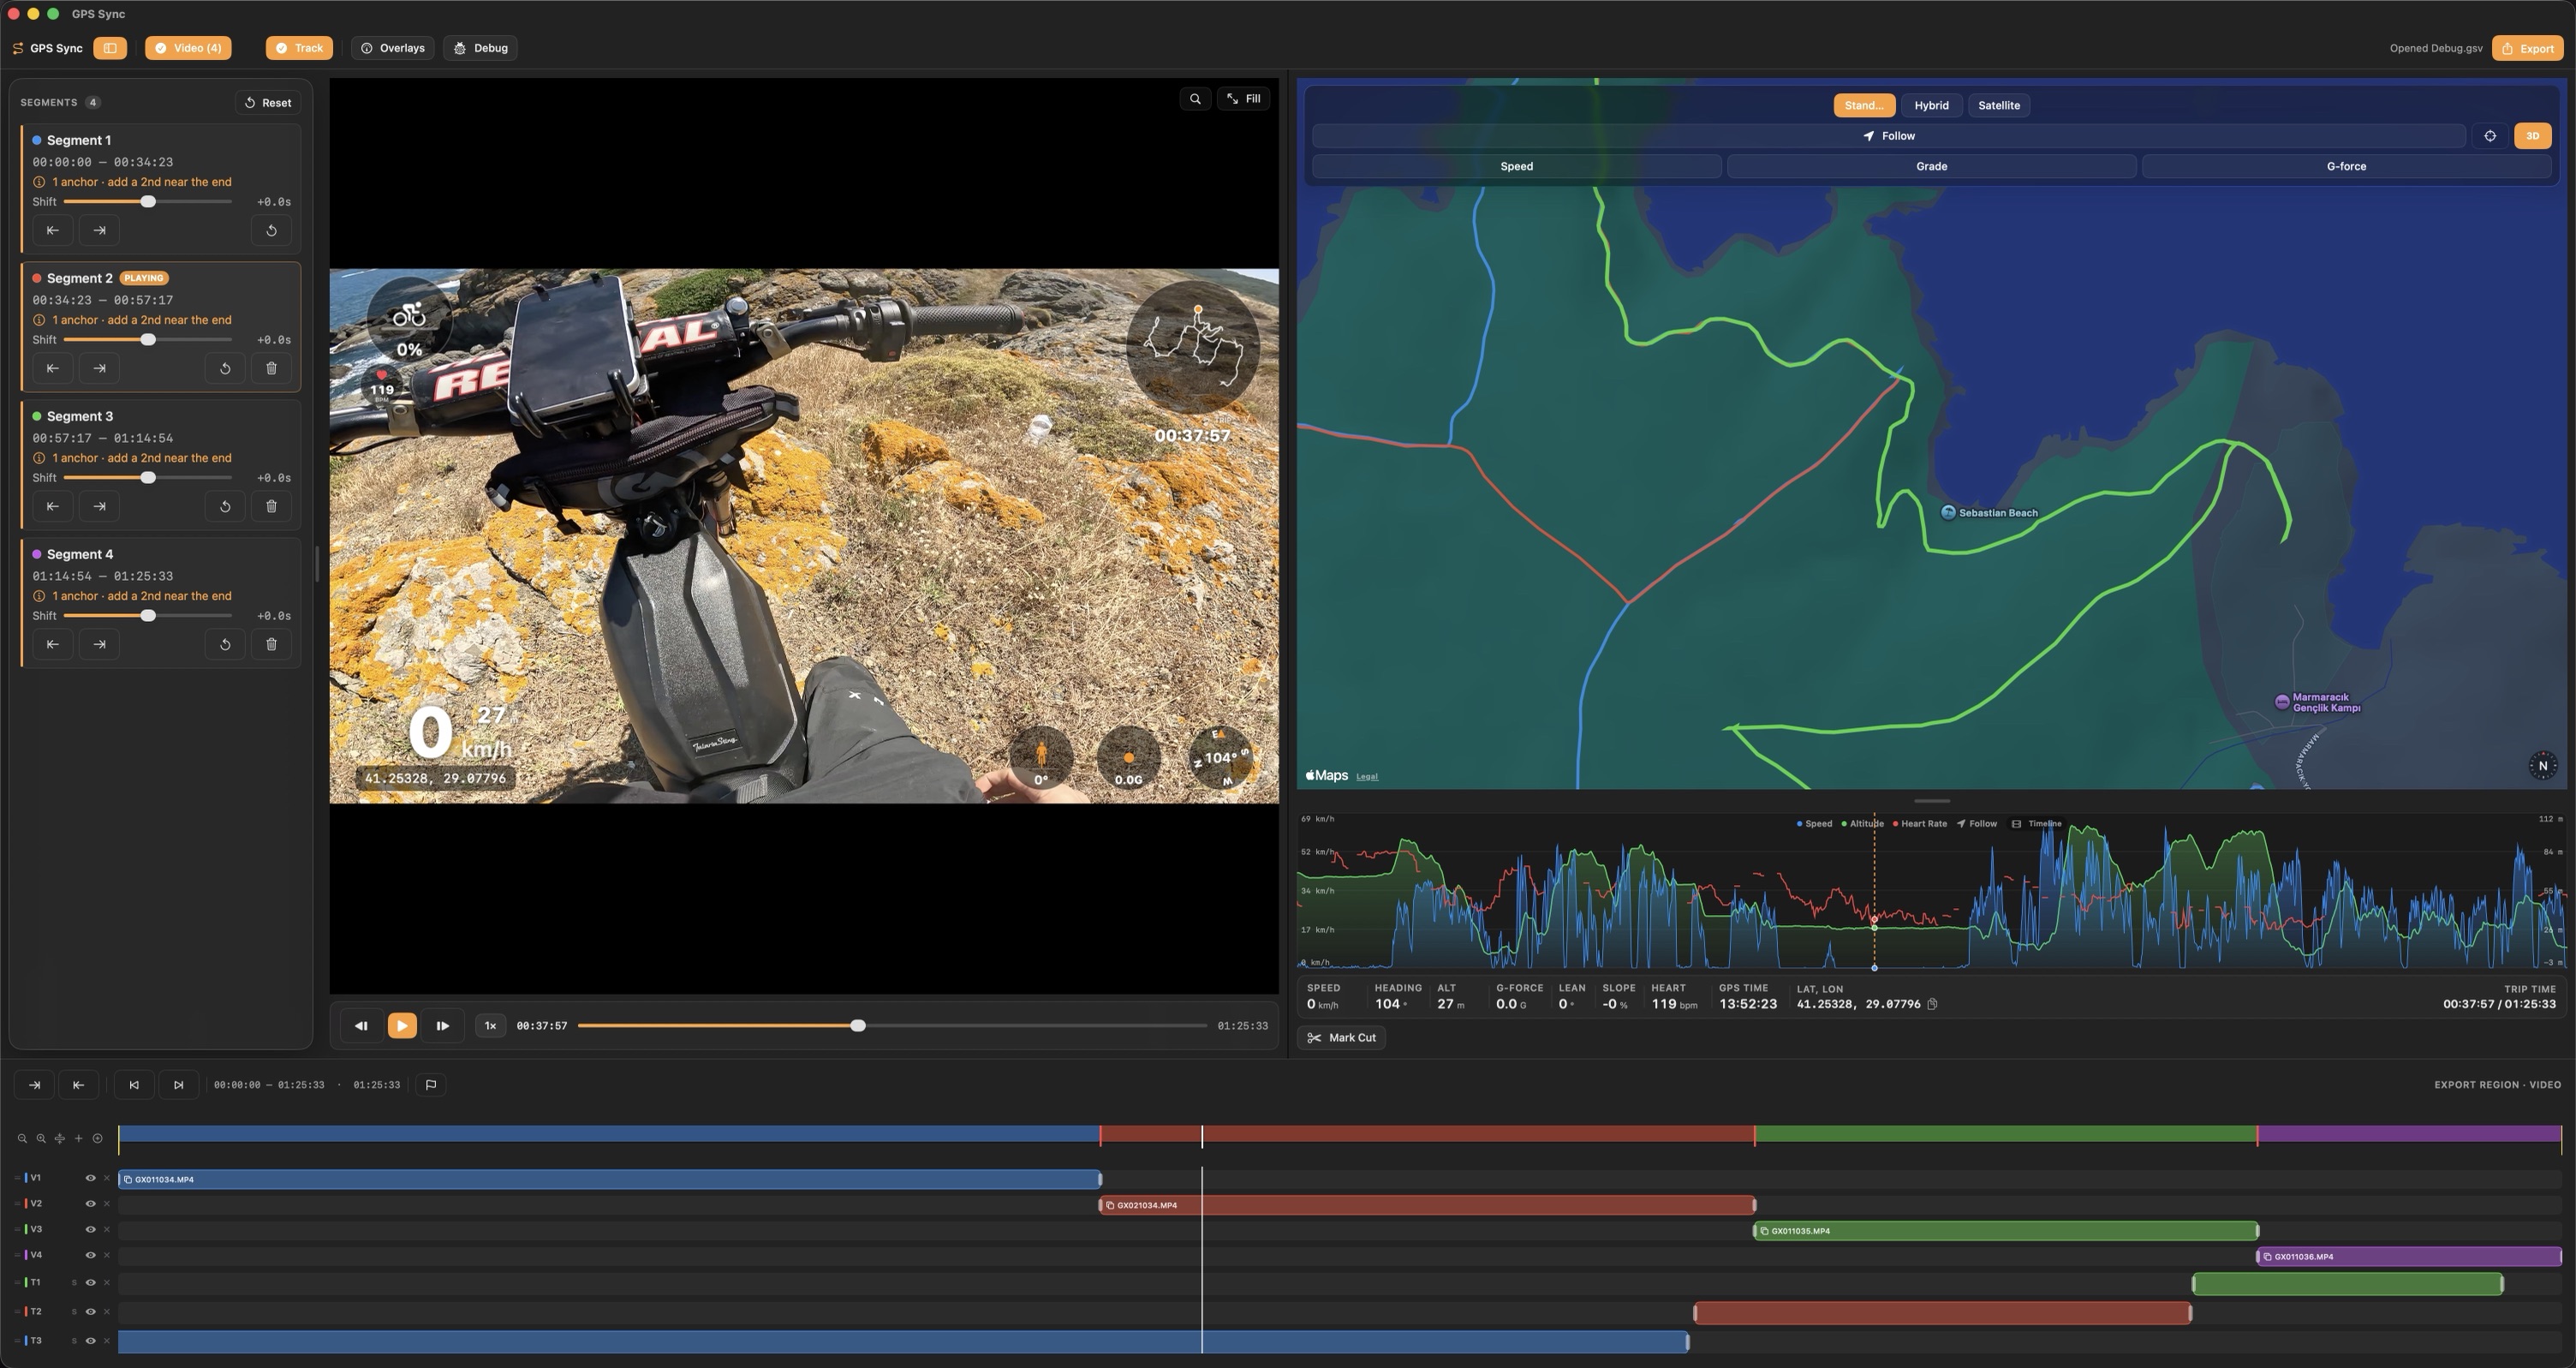
New in 2.0, the bottom strip is a real editing timeline: the program bar on top, one lane per video clip (V1, V2…), one track per data file (T1, T2…). Labels carry the filename in their tooltip.

Video clip lanes
- Drag a clip block to slide it along the timeline; edges snap to the playhead, markers, other clips and data coverage.
- Trim with the bracket handles at either end — in place and non-destructive, like your NLE.
- Overlaps are resolved by row order: the top lane wins. Drag the row labels vertically to reorder.
- The eye disables a clip without removing it — the lane beneath shows through.
Data tracks, layered
- Each track draws blocks at its true coverage — where it actually has data.
- Where tracks overlap, the topmost speaks. Use the eye to mute one, S to solo, or reorder rows to change priority. Example: lay a phone's accurate .trip over a camera's coarse embedded GPS — the .trip wins wherever it has data, and the embedded GPS fills its gaps.
- Drag a data track to align it against the video — with live snapping to the playhead, markers, clips and coverage.
- Nudge from the keyboard: ⌘⌥← / ⌘⌥→ move the selection one frame, ⇧⌘⌥← / ⇧⌘⌥→ five. Hold to keep going; the whole burst is a single ⌘Z, and the status line reports the distance in milliseconds.
- Ride markers dropped while recording are drawn on the row of the log they came from, as well as on the bar above. Drag that log and its markers travel with it.
- Trim handles bound the data non-destructively — trims live in the track's own clock and survive re-alignment.
Split, duplicate, group
- Split at Playhead (right-click, or ⌘B) cuts a clip or a data track in two — the tail becomes a new row. Both halves read the same source file.
- Duplicate copies a clip or track onto a new row beneath, same trims and alignment.
- Group (⌘G) makes selected clips and tracks select and move as one; ⇧⌘G ungroups — so moving a clip can carry its data with it.
- Click empty timeline space to deselect; Delete removes the selection (undoable).
Without a video
New in 2.2: load data tracks on their own and you still get the full timeline, laid out on a ride-time ruler that runs from the earliest sample to the latest across every track. Several logs of the same ride line up at a glance — where each starts, stops and overlaps.
- Rows behave as they do beside a video: select, reorder, eye, solo, delete — all undoable.
- Drag a row to slide that log along the ride: the fix for a logger whose clock was off. It snaps to markers, the playhead and the other tracks' edges, and the map and every readout follow the new placement immediately. Reset Position in the row's menu returns it to its own timestamps.
- The in/out region works here too, in ride time — see Exporting.
- Per-track trim handles stay video-only: they speak video time, so they appear once a video is loaded.
Zoom
+ / − zoom about the playhead, ⇧Z fits the whole timeline. Zooming scrolls rather than rescales, so a drag in progress never shifts under your cursor.
The map
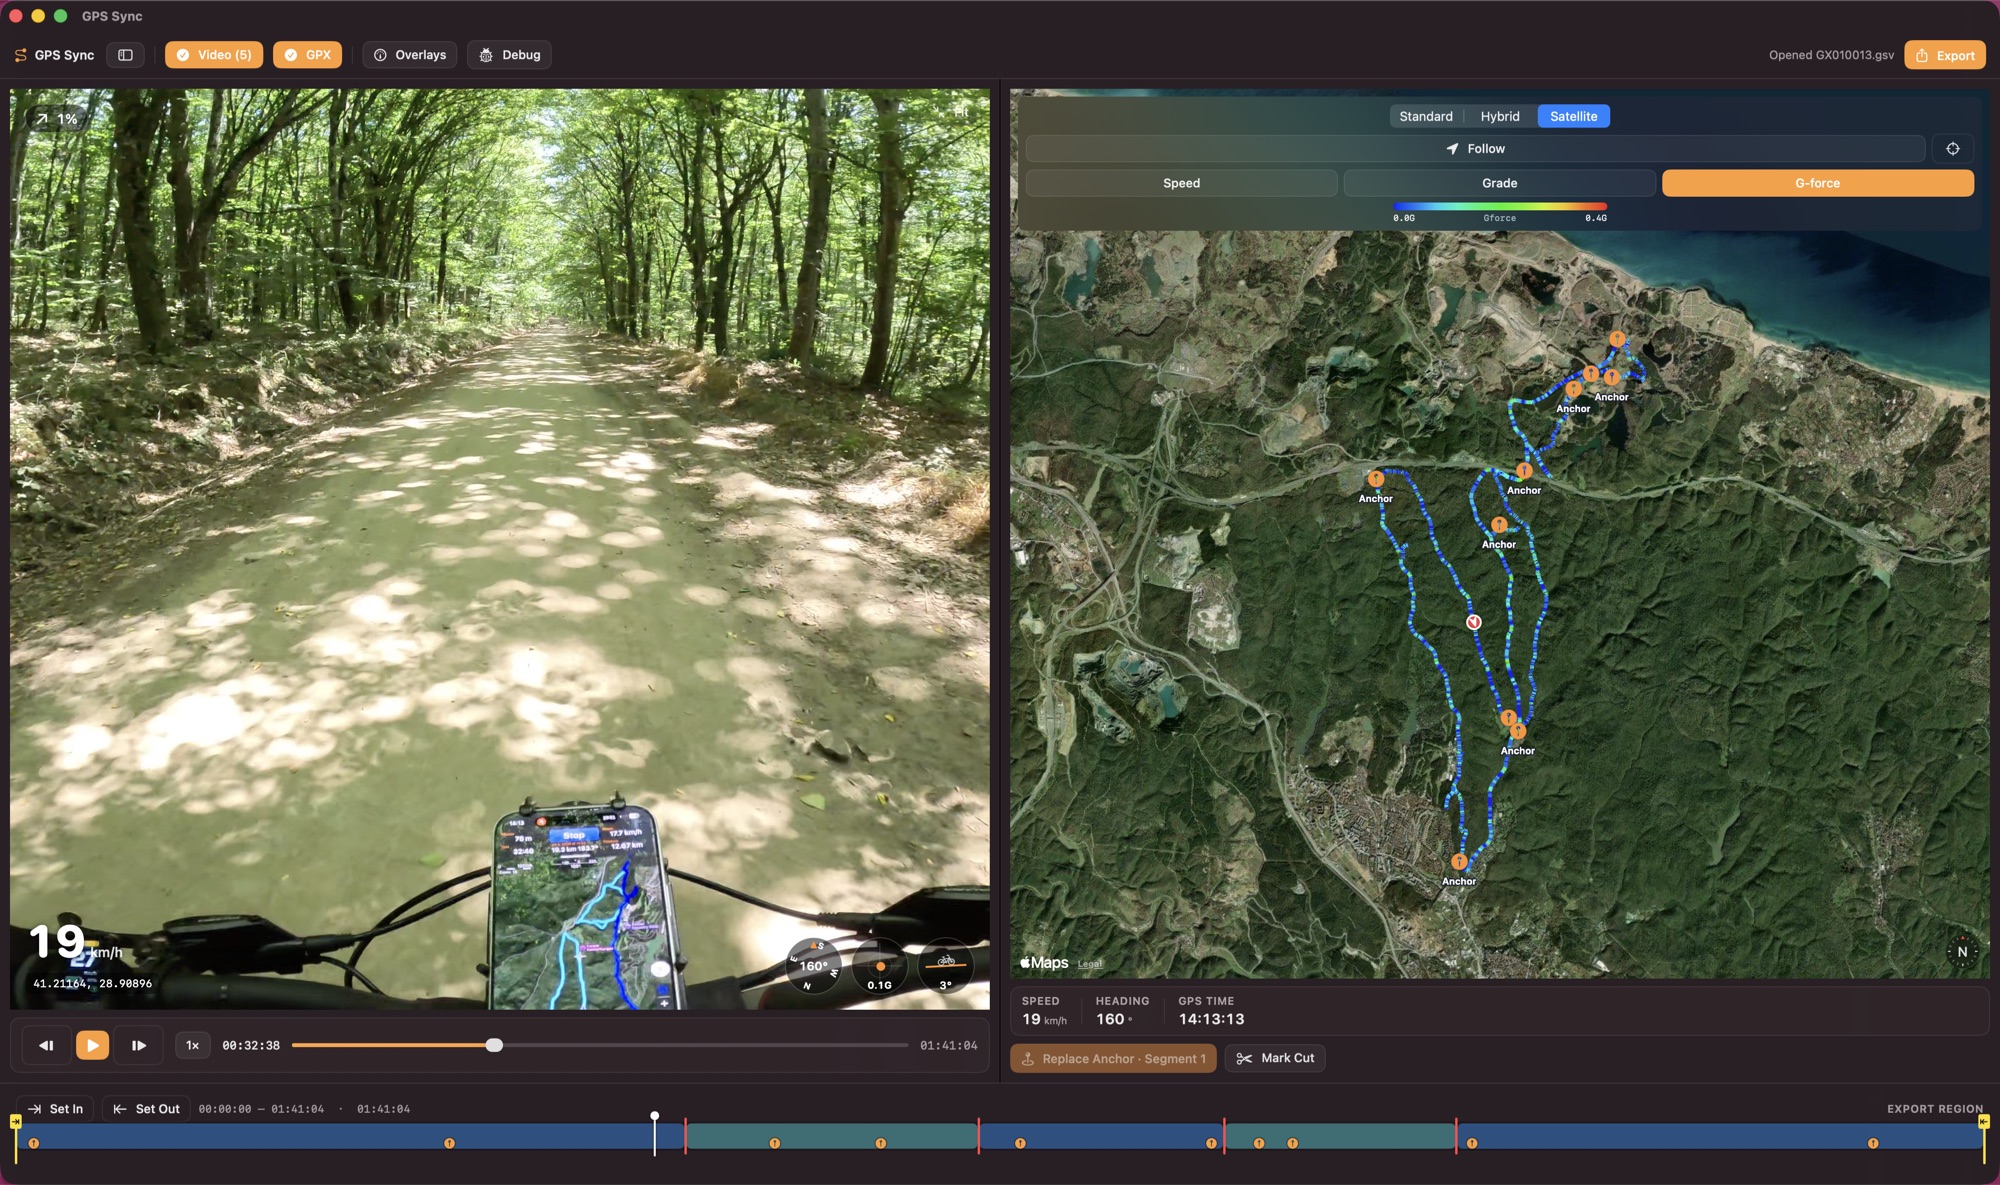
- Styles: Standard, Hybrid, Satellite — cycle with T. Your choice persists.
- 3D (D): tilts the camera over real terrain; while following, it faces the direction of travel. Toggling never moves the view you panned to.
- Follow (F) keeps the position marker centred during playback and, since 2.2, faces the direction of travel in 2D as well as 3D — the camera rides behind the marker either way, and 3D simply adds the tilt. Interaction is zoom-only while following, so a stray drag can't fight the camera.
- Colour the track by Speed (S), Grade (G) or G-force (A) with a live legend — see where you carried speed and where you braked hard.
- Timeline markers show as flags along the track.
- Every competing data track draws its own coloured path, so overlapping recordings read at a glance.
The profile graph

Speed (blue), elevation (green) and — when your track carries it — heart rate (red), with a live playhead and dots riding the curves.
- Scroll to zoom toward the cursor (up to 100×), drag to pan, click to seek. Follow (⇧F) keeps the playhead centred while zoomed.
- Timeline / Track toggle in the legend: plot across the whole video timeline (whichever track wins at each moment) or across the selected track's own recording.
- Heart rate is drawn with a padded scale and, by default, breaks across sensor dropouts instead of inventing data.
- Fill heart-rate gaps (Settings) bridges those dropouts — a watch or strap reports far less often than the logger samples, and drops out for minutes at a time. Filled stretches draw in a lighter red with a Filled chip in the legend, so an estimate never reads as a measurement. Your recording is untouched: switch it off and the gaps come back.
Overlays
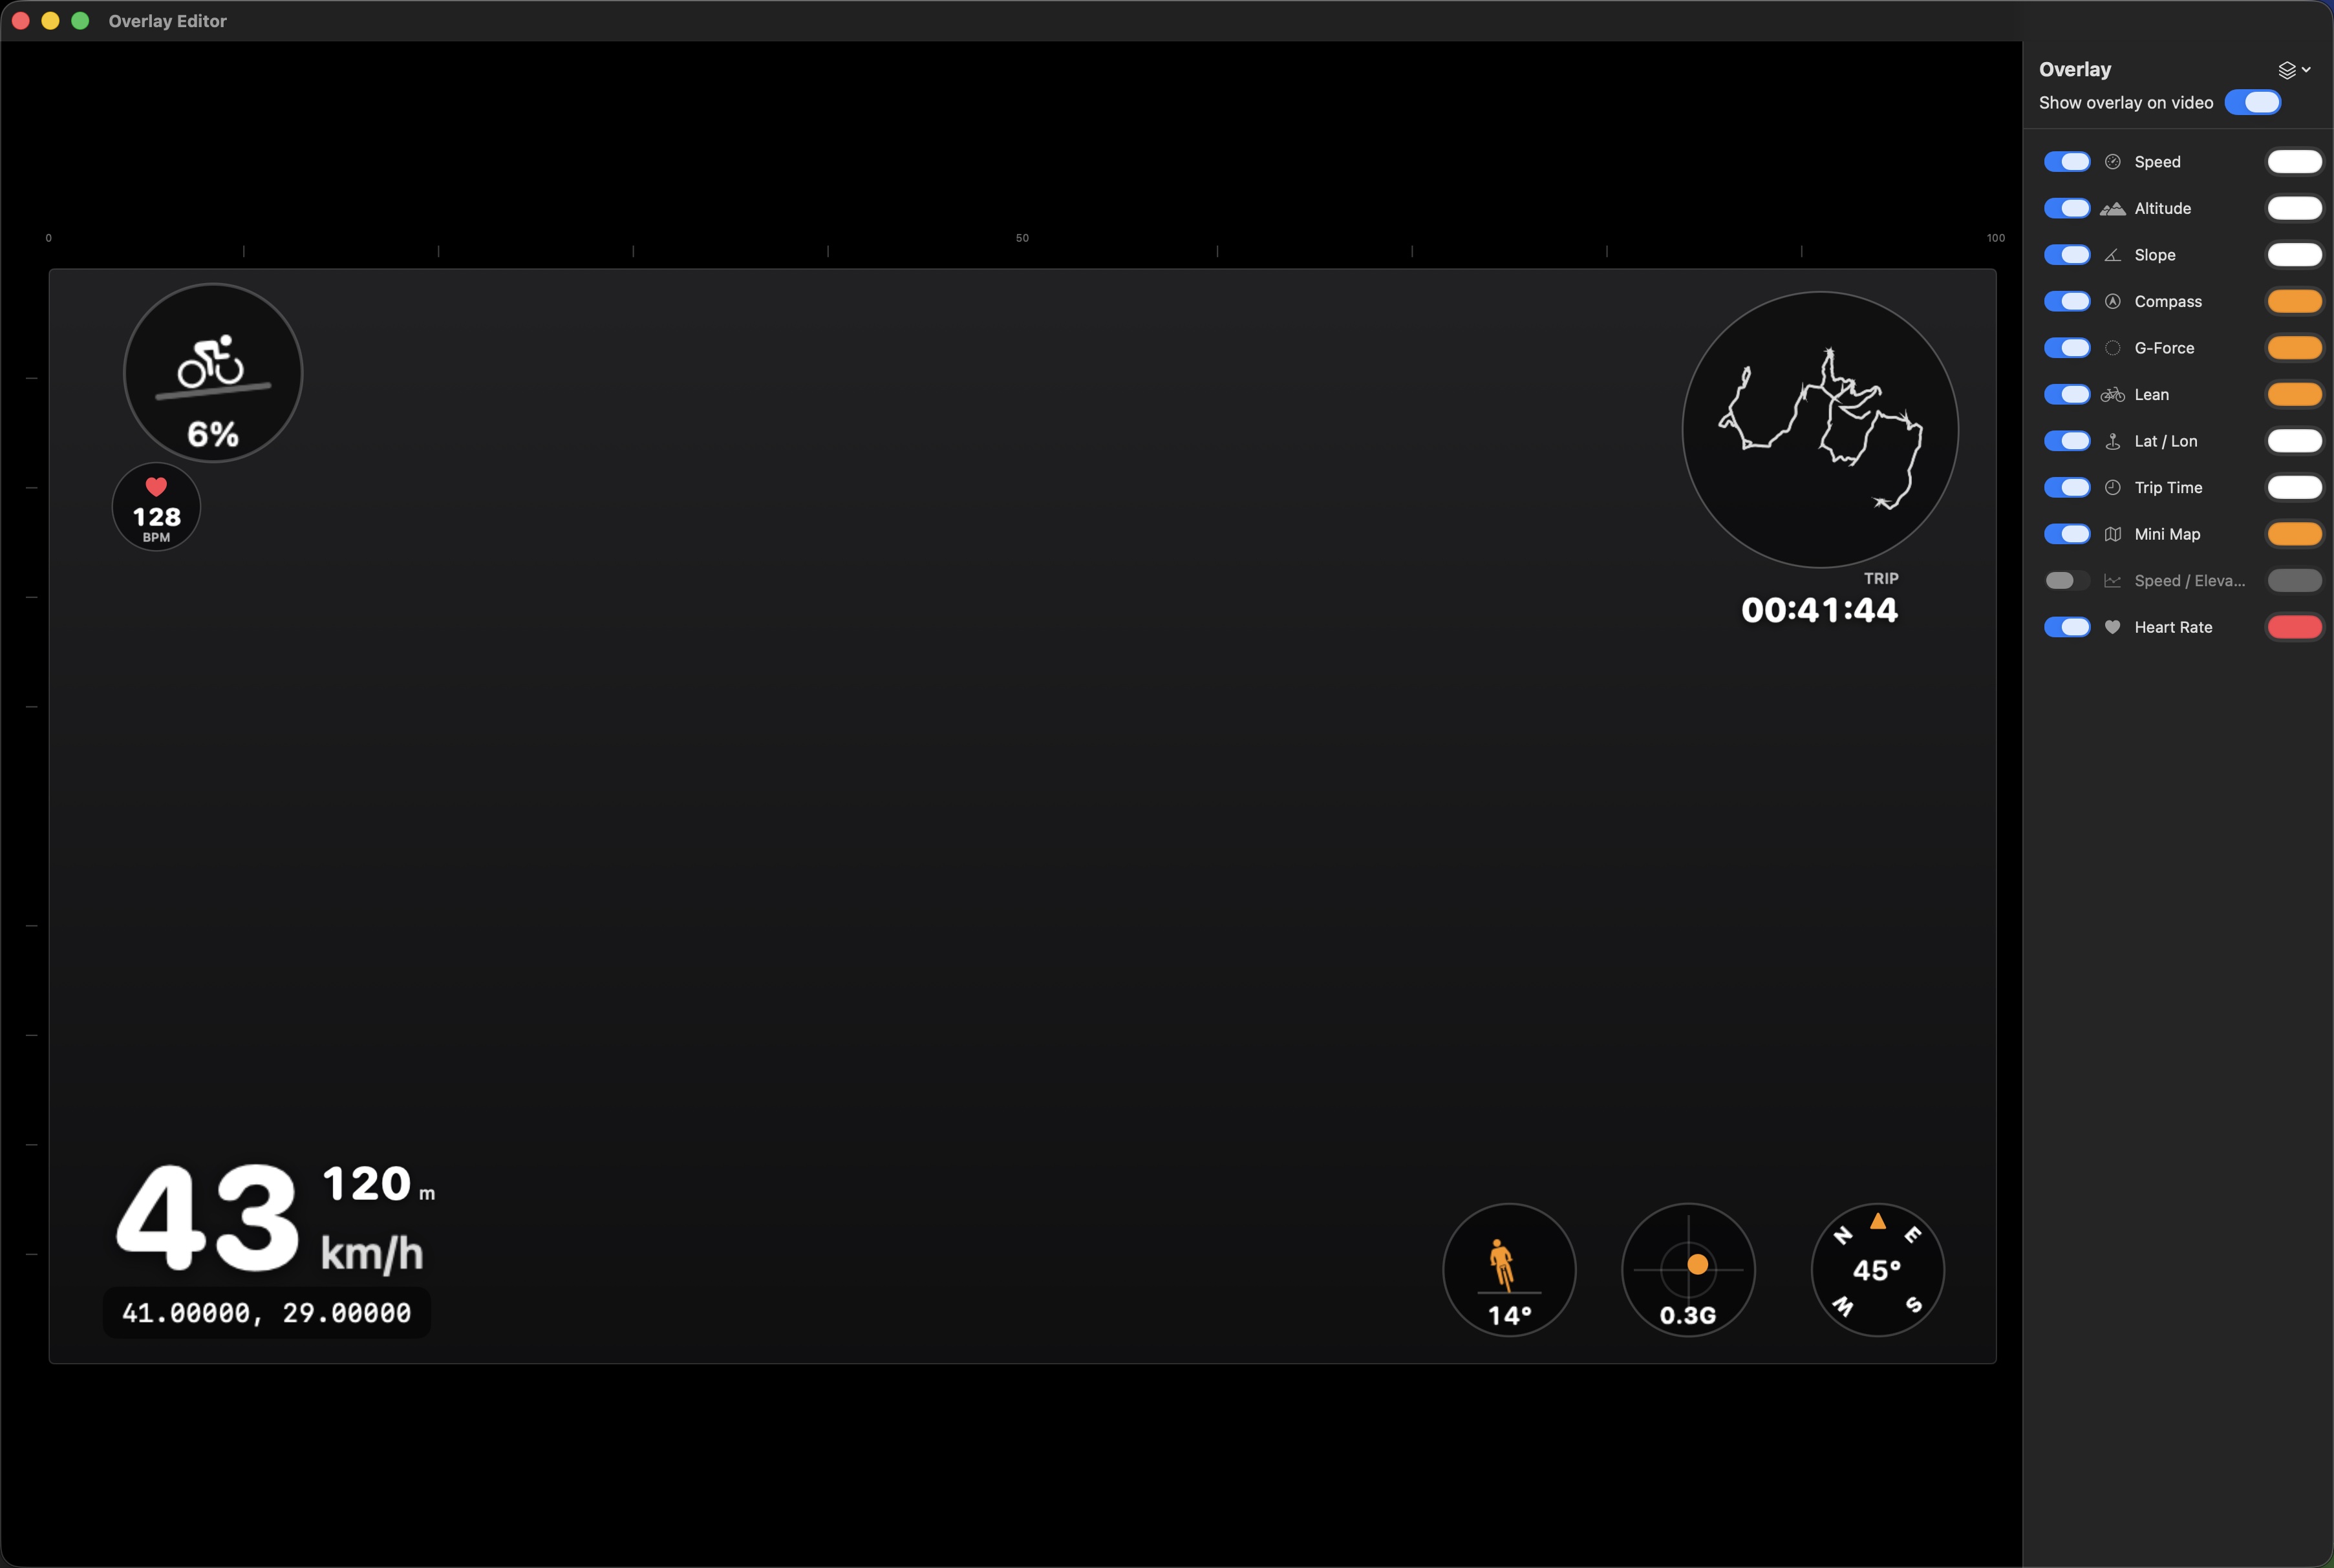
Click Overlays to open the editor. Nineteen data elements — speed, altitude, slope, compass, G-force, lean, heart rate, temperature, GPS source, coordinates, trip time, a mini-map, a speed/elevation graph, and a six-gauge EV cluster — freely placed, resized and coloured on a 16:9 canvas with snapping, guides and rulers.
The EV cluster
Rides recorded on a CAN-equipped electric motorcycle (Tripper .trip) unlock six more gauges: power and pack current dials, a tachometer with a red zone, a graphical battery whose fill turns orange under 30% and red under 15%, pack voltage over the ride's observed range, and the ride mode chip. Dials auto-scale to the ride's actual peaks with sensible headroom, needles are damped like a real dash cluster, and the whole cluster hides itself on rides without a bus — brief bus dropouts are bridged so gauges never blink.
Design layers
Add as many text, line, box and gradient layers as you like (the + menu). Text uses any installed font, face and size — double-click it on the canvas to edit. Lines and boxes have thickness, solid/dash/dot styles, rotation, length and (for boxes) corner roundness. Gradients fade your colour to transparent along a Photoshop-style drag handle — start it off-canvas for a partial fade; the classic use is darkening the lower third. Duplicate or delete layers via right-click or Delete.
Editing
- Multi-select with ⇧-click or a rubber-band drag. Move a group together (with snapping), scale it proportionally with the corner handle or the slider — or type an exact percentage into the scale field.
- Guides: drag them out of the rulers, exactly like Photoshop; elements snap to them, and dragging a guide back to the ruler deletes it. They draw above every element, and the Guide opacity slider in the sidebar dials them from a whisper to full strength — the guide you're dragging always shows at full strength.
- Layer order: the sidebar is a layers panel — drag rows to reorder (top = frontmost), right-click for Bring / Send, or step with ⌘] / ⌘[.
- Presets: built-ins (including EV Dashboard), save your own, export/import as files — your design layers survive preset switches. The layout is saved per project.
- Units: metric or imperial, everywhere at once. The live preview is WYSIWYG with the export — same fonts, same geometry, same symbols.
- In Settings, the time reference picks which clock the trip readouts use: Video, GPS, or Trip (00:00 at your in point).
Exporting
Video with overlays
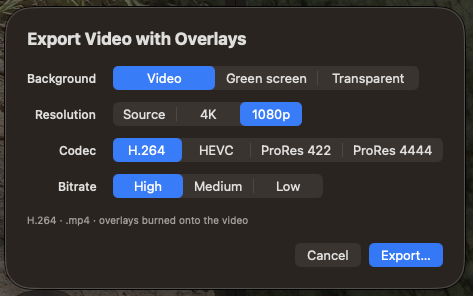
- Resolution: Source, 4K or 1080p — overlays render at full output resolution, crisp at 4K.
- Codec: H.264, HEVC or ProRes; GPU-accelerated on Apple Silicon, audio kept intact, live progress with an ETA.
- Background: burn onto the video, a chroma-key green screen, or a transparent ProRes 4444 alpha — composite in your editor.
- The in/out region scopes the export: set them with I-style Set In / Set Out buttons on the timeline row.
The track itself
- Remapped track (aligned projects): GPX, KML, KMZ or NMEA rebased to the video timeline — a 1:1 companion file for other tools, with your markers as waypoints.
- Raw track (no video, or not yet aligned): exports with original ride timestamps — use GPS Sync as a converter, e.g. Tripper .trip → GPX. Since 2.2 it honours the in/out region as well: set the region on the ride timeline with the handles or I / O and only those samples are written, ride markers inside it travelling along as waypoints (KML placemarks, NMEA $GPWPL).
Scenario: Overlay for a YouTube edit
- Sync your ride, set In/Out around the section you're editing.
- Design the overlay, then export with a transparent background (ProRes 4444).
- Drop the export over your edit in Final Cut / Premiere / Resolve — it lines up 1:1 with the same footage.
Projects & backups
- Save (⌘S) writes a .gsv project: every track's samples and alignment, the clip arrangement, trims, groups, markers, overlay layout, export region — even the playhead position.
- Pack Project… (File menu) copies the project plus the original clips and track file into one self-contained folder — the way to archive a ride or move it to another Mac.
- Moved media? One relink panel accepts the folder, all clips, or any one clip; siblings are found automatically. Missing clips load as black offline placeholders of the exact length, so alignment never breaks — relink whenever.
- Every destructive step is undoable with ⌘Z.
The magnifier
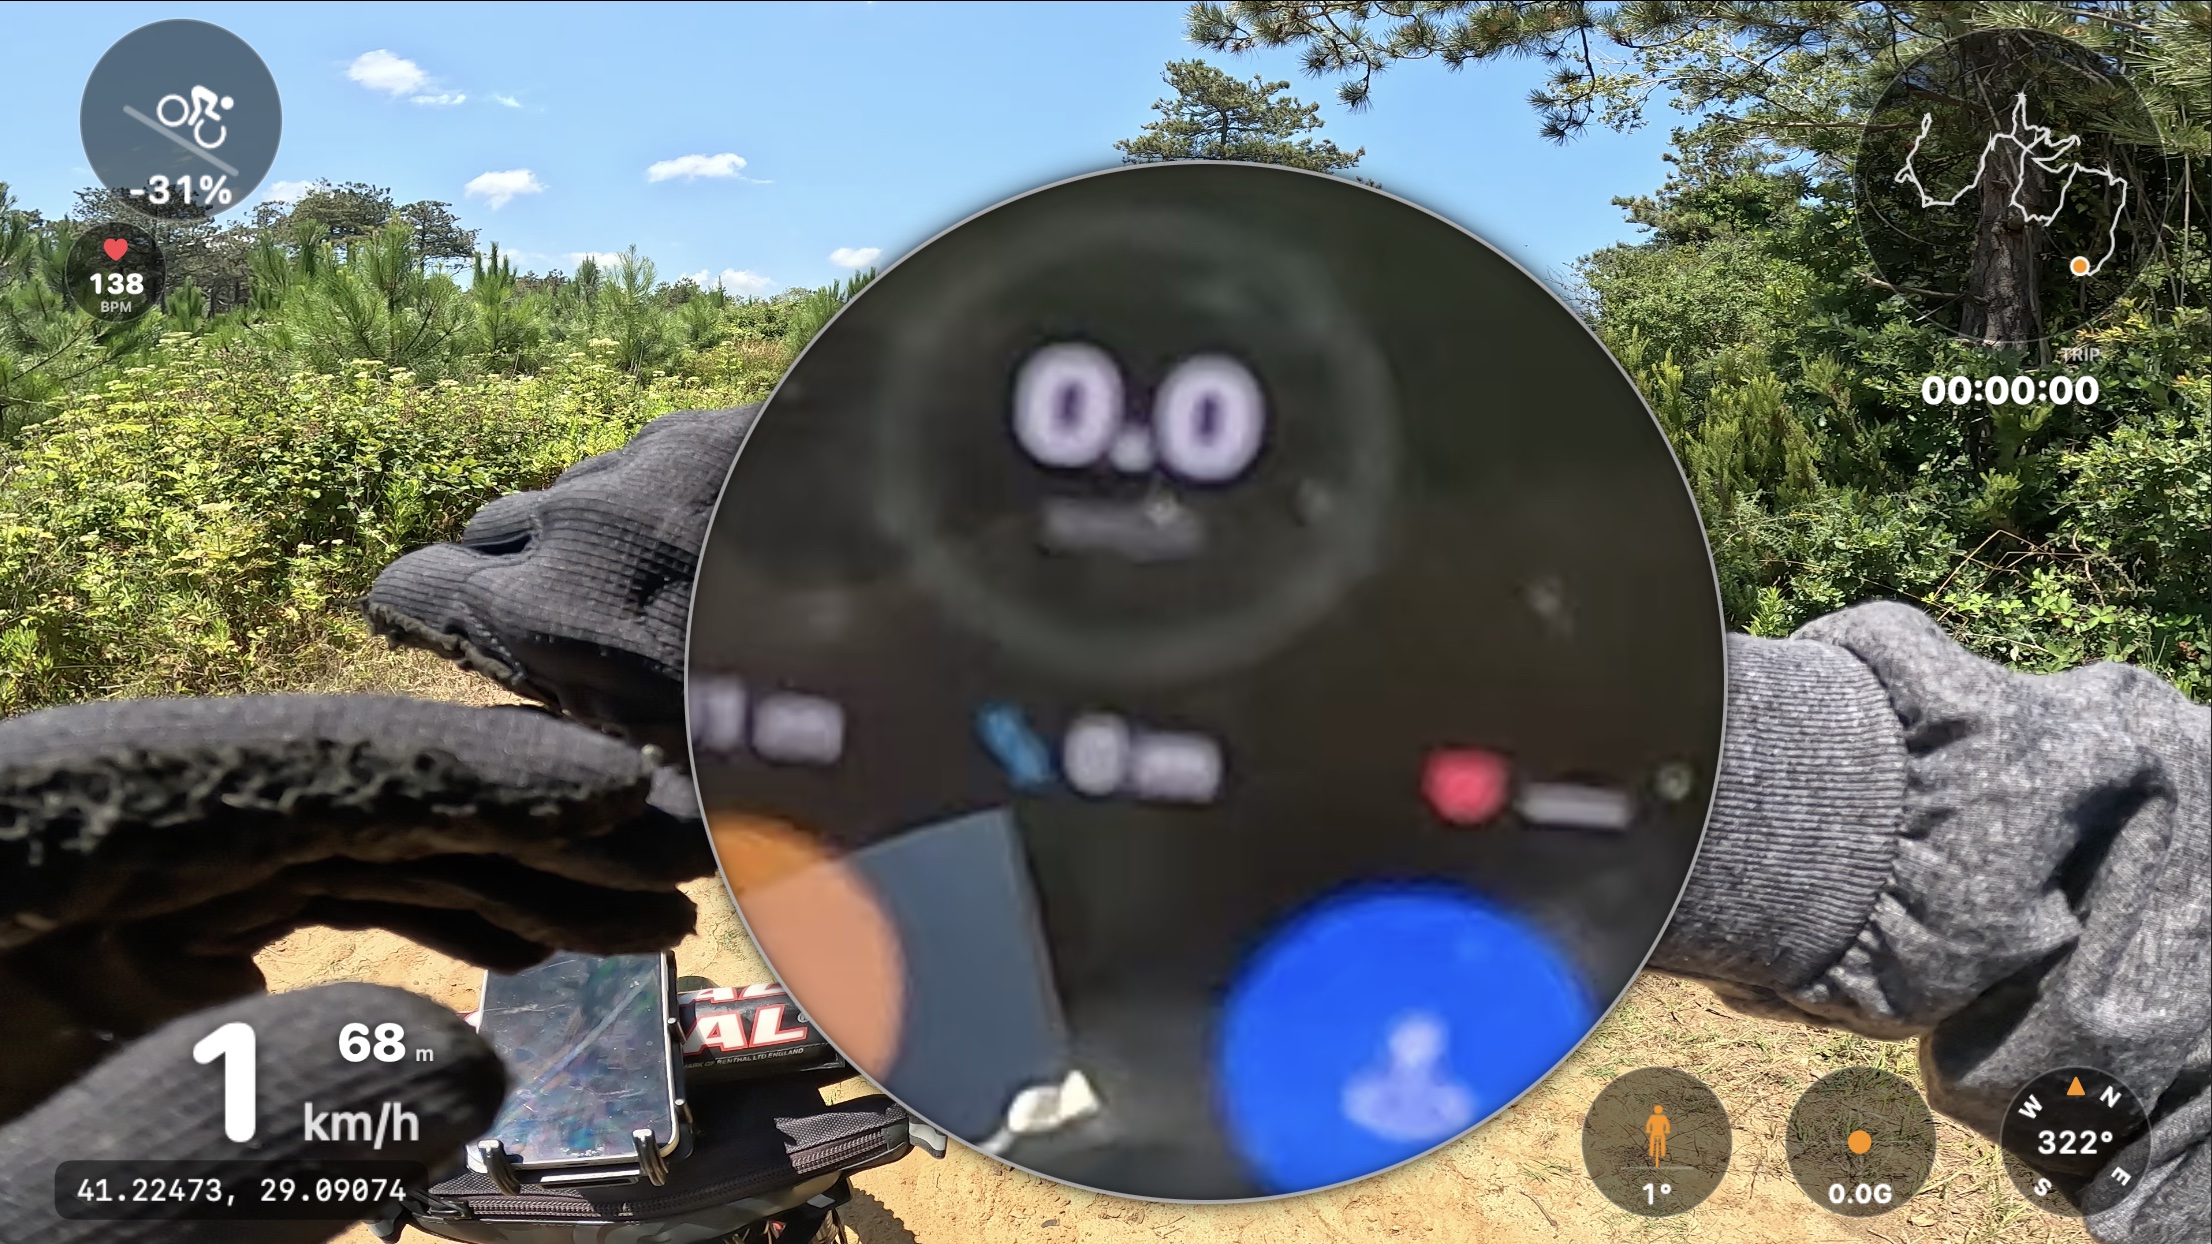
Press Z (or the magnifier button over the preview) for a loupe that decodes from the full-resolution source — not the scaled preview. Built for reading a bike computer, watch or dashboard in frame while you hunt for a sync moment.
- Click to pin it on a spot (click again to release) — it stays put while you scrub.
- Scroll changes magnification; ⇧-scroll resizes the glass.
Keyboard shortcuts
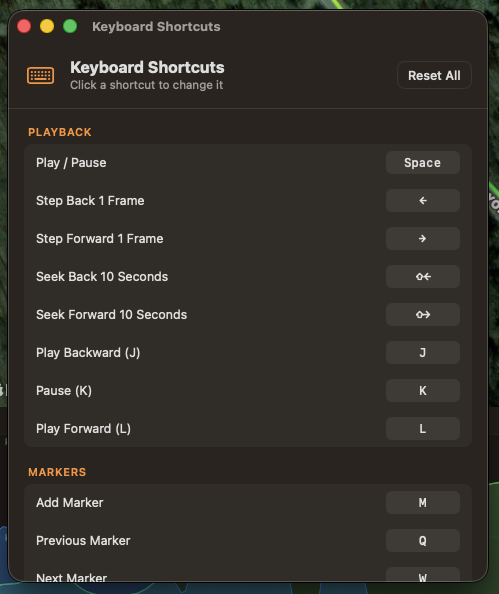
Defaults below — every app shortcut is re-bindable in GPS Sync → Keyboard Shortcuts…. The ⌘ project commands are standard macOS menu items.
| Playback | |
|---|---|
| Play / pause | Space |
| Step 1 frame / 10 s | ← → / ⇧← ⇧→ |
| Transport reverse / pause / forward | J K L |
| Export region | |
|---|---|
| Set in / out point | I / O |
| Go to in / out point | ⇧I / ⇧O |
| Timeline | |
|---|---|
| Zoom in / out / fit | + − ⇧Z |
| Split at playhead | ⌘B |
| Nudge selection 1 frame / 5 frames | ⌘⌥← ⌘⌥→ / ⇧⌘⌥← ⇧⌘⌥→ |
| Delete selected | Delete |
| Group / ungroup | ⌘G / ⇧⌘G |
| Show / hide selected | V |
| Add marker · previous · next | M Q W |
| Mark cut | C |
| Map & views | |
|---|---|
| Follow · style · 3D | F T D |
| Colour by speed / grade / G-force | S G A |
| Graph follow | ⇧F |
| Magnifier · fit/fill preview | Z · X |
| Overlay editor | |
|---|---|
| Nudge selection 1 px / 10 px | ←→↑↓ / ⇧+arrows |
| Delete selected design layer(s) | Delete |
| Bring forward / send backward | ⌘] / ⌘[ |
| Bring to front / send to back | ⇧⌘] / ⇧⌘[ |
| Project | |
|---|---|
| New / open project | ⌘N / ⌘O |
| Save / save as | ⌘S / ⇧⌘S |
| Undo | ⌘Z |
| Settings | ⌘, |
| Main window | ⌘0 |